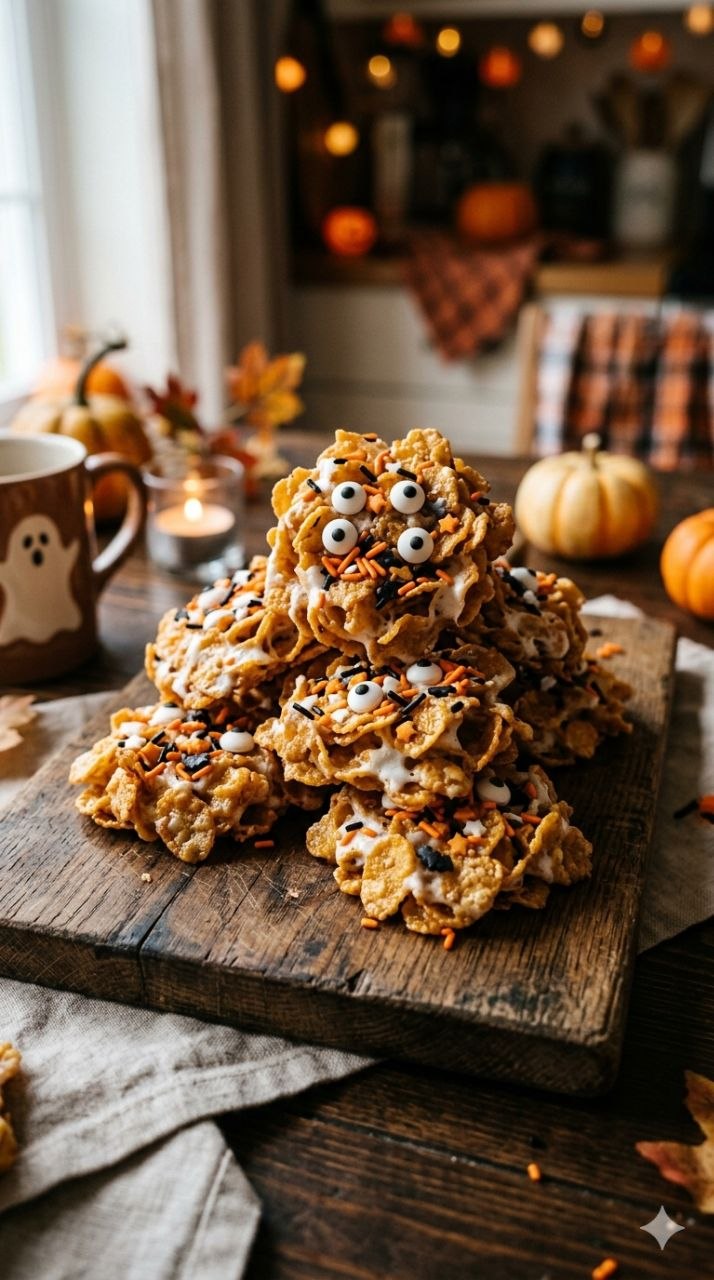
Halloween Cornflake Cookies: 5 Effortless Fixes for Grey, Damp, Festive-Needing October Days
The Comfort Intro (Short & Sweet)
Halloween cornflake cookies have been a quiet staple in our house for years. They’re the kind of thing I make when the days are getting shorter, the air has that damp chill to it, and I want something festive without turning the kitchen upside down. It was a grey Tuesday the first time I made them this season—rain tapping on the window, kids coming in and out for snacks—and these cookies fit right into the rhythm of the day.
They’re simple, sweet without being over-the-top, and sturdy enough to survive a busy kitchen. Halloween ghost cornflake cookies don’t ask much of you, which is exactly what I appreciate in October.
Why It Works
I keep coming back to Halloween ghost cornflake cookies because they check the boxes that matter in a real household.
They’re affordable. Cornflakes, sugar, butter, and marshmallows are all pantry staples, especially if you shop with an eye to sales. Even with candy eyes or a bit of chocolate for decoration, the cost per cookie stays low. When I break it down, these usually land at well under a dollar per serving, often closer to fifty cents if you catch the marshmallows on sale.
They’re filling in that satisfying, after-school way. Cornflakes give them crunch and bulk, so one or two actually feels like a treat, not just a sugar hit that disappears in five minutes. For kids running in from the cold, that matters.
They hold up well. Halloween ghost cornflake cookies don’t go stale overnight the way some baked cookies can. I’ve made them a day or two ahead for school events or neighbourhood gatherings, and they’re still perfectly fine—sometimes even better once they’ve fully set.
They also suit our climate. October in Canada can swing wildly, but it’s often chilly enough that no-bake treats like these set nicely on the counter. You’re not fighting humidity or heat, which makes the process calmer and more predictable.
All of that makes Halloween ghost cornflake cookies a budget-friendly meal-adjacent treat—easy comfort food Canada-style, where practicality always comes first.
Pantry & Fridge Reality (Ingredients)
I always look at a recipe through the lens of what I already have. Halloween ghost cornflake cookies are forgiving that way.
Cornflakes:
Plain, no-frills cornflakes work best. I usually buy the store brand in the biggest box that makes sense for our household. If you’re a Costco shopper, those oversized boxes are ideal and last well past Halloween. If the flakes are a bit crushed at the bottom of the bag, that’s fine—they actually help the cookies hold together.
Marshmallows:
Standard white marshmallows are what I reach for. Mini marshmallows melt faster and more evenly, but regular ones work too if that’s what’s on hand. I avoid flavoured or coloured marshmallows here; the ghosts look better plain.
Butter:
Unsalted butter is my default. If all you have is salted, just be aware the cookies will have a slightly salty-sweet edge. That’s not a bad thing in our house, especially with kids who like contrast.
Sugar or Corn Syrup (depending on version):
Some versions of Halloween ghost cornflake cookies rely on melted marshmallows alone, others add a bit of sugar or corn syrup for stability. I’ll talk through both approaches later. I use what’s already in the pantry.
Vanilla:
Optional, but nice. It adds warmth and rounds out the sweetness. I don’t stress if I’m out.
Candy Eyes or Chocolate Chips:
This is the one ingredient that feels a bit extra, but even then, it’s optional. Chocolate chips pressed in upside-down work just fine as eyes if that’s what you have. Sometimes I skip faces altogether.
Approximate cost per serving:
Depending on sales and how decorative you get, these usually work out to about $0.40–$0.70 per cookie. That’s reasonable for a seasonal treat that feels special.
The Cooking Journey (Experience-Based, Step-by-Step)
This is a recipe I’ve made enough times that I don’t rush it anymore. The calm pace is part of why it works.
Getting Set Up
First, I clear a bit of counter space and line a couple of baking sheets with parchment paper. I’ve learned the hard way that scrambling for parchment with sticky hands is not ideal. Wax paper works in a pinch, but parchment is sturdier and less likely to wrinkle.
I measure out the cornflakes into a large bowl. Bigger than you think you need. One of the most common mistakes is underestimating how much room you’ll need for stirring later.
Melting the Base
Next, I set a medium saucepan over low to medium-low heat. This is important. Too much heat is mistake number one with Halloween ghost cornflake cookies.
I add the butter first and let it melt slowly. You’ll hear a gentle sizzle, not a sharp hiss. If the butter starts browning, the heat’s too high—slide the pot off the burner for a moment and turn it down.
Once the butter is melted, I add the marshmallows. The smell at this point is unmistakable—sweet, warm, and very October somehow. I stir constantly with a wooden spoon, scraping the bottom of the pot.
Mistake #1: Scorching the bottom
If you stop stirring, even for a minute, the sugars can stick and scorch. If that happens, don’t scrape the burnt bits into the mixture. Transfer what you can to a clean pot and keep going. A little loss is better than a bitter taste.
As the marshmallows melt, the mixture turns glossy and smooth. If I’m using vanilla, it goes in right at the end, off the heat, so it doesn’t cook off.
Bringing It Together
Once that’s done, I pour the hot marshmallow mixture over the cornflakes. This part always sounds louder than I expect—the flakes crackle as the heat hits them.
Using a sturdy spatula, I fold gently but thoroughly. The goal is to coat every flake without crushing them into dust.
Mistake #2: Over-stirring
If you stir too aggressively, the cookies lose their structure and turn dense. Gentle folding keeps them light.
Shaping the Ghosts
After that, I let the mixture sit for about a minute. This is a small but important pause. It cools just enough to be handled without burning fingers.
With lightly buttered hands or two spoons, I scoop mounds onto the prepared baking sheets. I shape them into loose ghost forms—rounded at the bottom, slightly peaked at the top.
Mistake #3: Working too slowly
If you take too long, the mixture firms up and becomes hard to shape. If that happens, you can warm the bowl slightly over a pot of hot water to soften it again.
Decorating
Once the cookies are shaped, I press in candy eyes or chocolate chips while they’re still warm. Waiting too long means they won’t stick.
Mistake #4: Adding decorations too early
If you add eyes while the mixture is still very hot, they can slide right off. Waiting that minute or two makes all the difference.
Then I let them set at room temperature. In a cool kitchen, that usually takes about 30 minutes.
Feeding the Family & Leftover Logic
I usually set out Halloween ghost cornflake cookies after supper, once dishes are done and things have slowed down. One or two per person is plenty.
For leftovers, I store them in an airtight container on the counter. They’re good for several days, though they rarely last that long here.
The next day, they’re slightly firmer but still chewy. If they’ve gone a bit too firm, a few seconds in the microwave softens them up.
Leftover cookies also crumble nicely over vanilla ice cream, which feels like a small luxury on a cold night.
Variations for Different Days
The Busy Day Version:
Use mini marshmallows—they melt faster and save time. Skip decorations entirely.
The Sunday Version:
Take your time shaping them neatly and add little details like drizzled chocolate faces.
Lower-Sugar Version:
Use less marshmallow mixture and more cornflakes. They’re less sweet but still satisfying.
Seasonal Twist:
Add a pinch of cinnamon or nutmeg to the melted marshmallow for warmth.
Allergy-Friendly:
Skip candy eyes and use icing sugar dots instead.
Common Questions (Neighbourly FAQ)
Can I make Halloween ghost cornflake cookies ahead of time?
Yes. One to two days ahead works well.
Do they need to be refrigerated?
No. Room temperature is best.
Why are my cookies too hard?
Usually too much heat or over-stirring.
Can I freeze them?
I don’t recommend it; the texture suffers.
What if I’m out of butter?
You can use margarine, though the flavour changes slightly.
Can kids help?
Absolutely, especially with shaping and decorating.
Closing (Grounded Reassurance)
Halloween ghost cornflake cookies have earned their place in our rotation because they’re dependable. They don’t demand perfection or fancy tools. They just work, even on long weeks when you’re tired and the weather’s closing in.
Making them builds quiet kitchen confidence. You learn how heat behaves, how timing matters, and how small adjustments make a difference. That’s the kind of cooking knowledge that carries you through winter.
Recipe Card: Halloween Ghost Cornflake Cookies
Prep Time: 15 minutes
Cook Time: 10 minutes
Total Time: 45 minutes
Servings: 18–24 cookies
Calories: ~120 per cookie (varies with size and decorations)
Ingredients
- 6 cups plain cornflakes (store brand is fine; about $1.50 worth)
- 3 cups mini marshmallows or 30 regular marshmallows
- 3 tbsp unsalted butter
- 1 tsp vanilla (optional)
- Candy eyes or chocolate chips for decorating
Method
- Line two baking sheets with parchment paper.
- Measure cornflakes into a large heatproof bowl.
- Melt butter in a saucepan over low heat.
- Add marshmallows and stir constantly until smooth.
- Remove from heat and stir in vanilla if using.
- Pour marshmallow mixture over cornflakes and fold gently.
- Let sit 1 minute, then shape into ghost mounds on baking sheets.
- Add eyes while warm.
- Let set at room temperature for 30 minutes before serving.
Halloween ghost cornflake cookies show up year after year because they fit real life. They’re steady, affordable, and comforting—exactly what I want on a chilly October day.