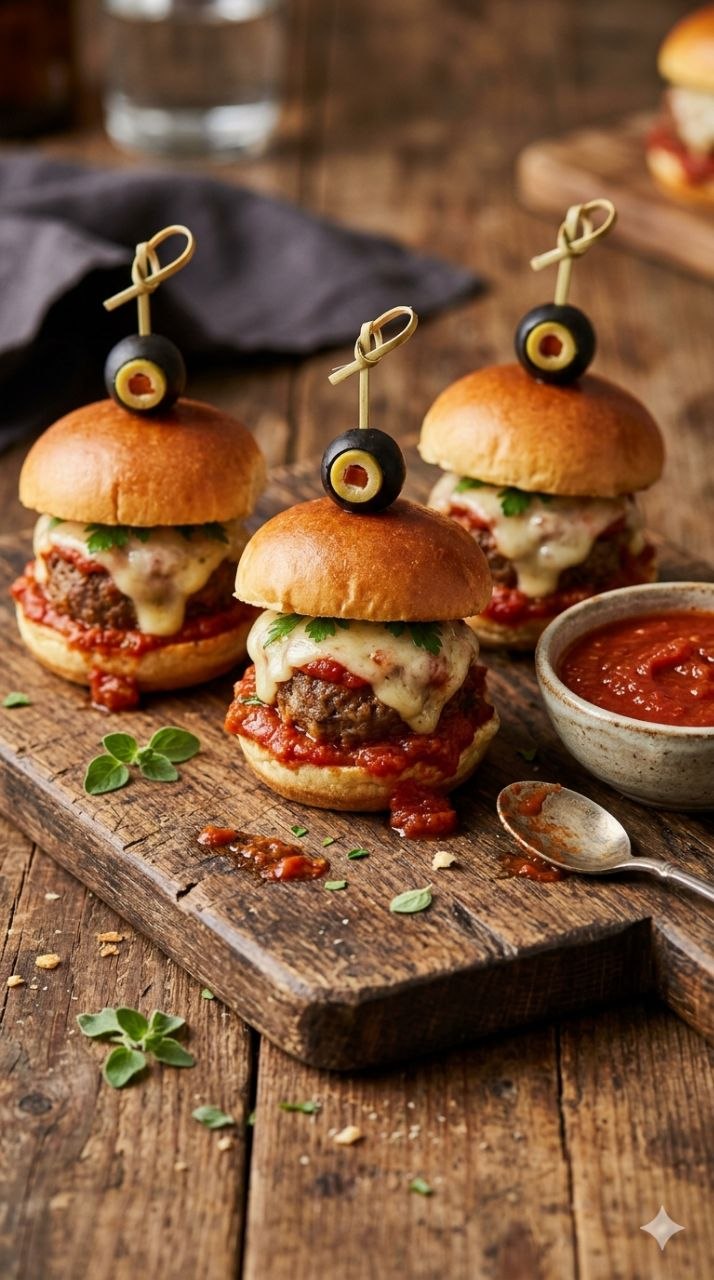
Halloween Meatball Sliders: 6 Effortless Fixes for Frosty, Windy, Grocery-Bill-Friendly Nights
It was one of those crisp October evenings when the wind rattled the windows just a bit and the first hint of frost was settling in. I wanted something fun, hearty, and simple to make for the family—something that could double as a little Halloween treat without sending my grocery bill through the roof. That’s how Halloween Meatball Sliders became a staple in our house. They’re playful, filling, and perfect for a busy weeknight or a small Halloween get-together. The kids get their spooky fun, and the adults get a warm, comforting bite that doesn’t require hours in the kitchen.
Why It Works
These sliders hit all the right marks for a practical Canadian home cook:
- Affordable: Ground beef or turkey, pantry staples like breadcrumbs and canned tomato sauce, and some cheese make these sliders budget-friendly. Depending on where you shop, you can feed 4–6 people for around $10–$12.
- Filling: Meatballs stuffed into soft slider buns with a little melted cheese are satisfying enough that one or two per person is plenty for dinner. Add a side of roasted veggies or a simple salad, and you’ve got a full meal.
- Reheats Well: Make a double batch, freeze extras, or reheat in the oven—they maintain texture and flavour nicely, unlike some meatball recipes that get soggy.
- Kid-Friendly: Mild seasoning keeps it approachable for younger palates, but there’s room to add some heat or herbs for adults.
- Seasonal Fun: The “monster” presentation—little eyes made from olives or cheese—makes them festive without being fussy. Perfect for October evenings when the nights are long and a little playful dinner helps lift spirits.
Pantry & Fridge Reality
Before you Halloween Meatball Sliders start, here’s what you’ll actually need—and some realistic swap-outs if your local store is missing an ingredient:
- Ground meat (beef, turkey, or a mix) – About 1 lb (450 g). Turkey keeps cost down and makes them lighter; beef is richer.
- Breadcrumbs – I usually keep plain or Italian-style breadcrumbs on hand. If you’re out, crushed crackers or even oatmeal works in a pinch.
- Eggs – 1–2 to bind. If you’re out, a couple tablespoons of plain yogurt or milk mixed with a little flour can do the job.
- Onion & garlic – Adds depth. Frozen minced onion works perfectly if fresh is scarce.
- Cheese – Slices or shredded cheddar, mozzarella, or whatever’s on sale. Budget tip: shredded blocks are cheaper than pre-shredded.
- Slider buns or small rolls – I usually get a pack of 12; leftovers freeze well. You could even slice a baguette into sections if needed.
- Canned tomato sauce / marinara – 1 cup or so for the meatballs to simmer in. Alternatively, a simple mix of ketchup and a touch of water works in a pinch.
- Olives, bell pepper, or cheese bits for “monster eyes” – Totally optional but fun. Kids love helping here.
Cost per serving: Approximately $2 per slider with meat and sauce, depending on meat choice and local prices.
Tip: Keep an eye out for ground meat specials at Costco or local markets—they freeze beautifully and save you a couple of dollars per dinner.
The Cooking Journey
Here’s where the heart of the meal comes alive. I’ll walk you through making these Halloween Monster Meatball Sliders the way I do in our kitchen, including the small mistakes I’ve learned to avoid over the years.
Prep and Mixing
First, I get my workspace ready. I line up a bowl for the meat, a smaller one for breadcrumbs, and my chopping board. I start by finely chopping onion and garlic; the smell hitting the air always makes the house feel warmer.
I mix the meat with breadcrumbs, egg, a pinch of salt and pepper, and a little dried oregano or Italian seasoning. A tip I’ve learned: don’t overmix. If you handle it too much, the meatballs turn dense. Lightly combining until everything just holds together is enough.
Common mistake #1: Forgetting to taste-season the mixture. Since raw meat isn’t safe to taste, I take a tiny pinch of the meat mixture, cook it quickly in a skillet, and adjust seasoning. Saves a bland dinner later.
Forming the Meatballs
I roll them into small balls, about the size of a golf ball. For sliders, small meatballs work best—they fit nicely in the buns and bake evenly.
Common mistake #2: Making them too big. Big meatballs cook unevenly; they might be undercooked inside while the outside browns too fast.
Next, I brown them in a skillet. The sizzle and smell are half the fun. I do this in batches, so they sear nicely instead of steaming.
Common mistake #3: Crowding the pan. If the meatballs are too close, they release water and don’t brown properly.
Simmering in Sauce
Once browned, I add the tomato sauce, cover, and let them simmer for 10–15 minutes. The sauce keeps them moist and infuses flavour. I keep the heat medium-low, stirring occasionally.
Common mistake #4: Not stirring enough. Some meatballs like to stick to the bottom, especially if the sauce is thick. A gentle shake or spoon helps.
Assembling the Sliders
While the meatballs simmer, I toast the buns lightly—this keeps them from getting soggy. Then, I layer each bun with a couple of meatballs, a slice of cheese, and some fun “monster eyes” using sliced olives, bell pepper, or small dots of mozzarella.
Common mistake #5: Forgetting to account for cheese melt. Cheese can slide off if added too early; add it in the last minute of simmering or right before serving.
Baking Optional
For extra melt and cohesion, I sometimes place the assembled sliders on a baking sheet and bake at 375°F (190°C) for 5 minutes. It just makes everything a bit more cohesive and the buns a little warm and golden.
Common mistake #6: Overbaking buns. They dry out quickly—5 minutes is plenty.
Feeding the Family & Leftover Logic
These sliders are perfect for small appetites and big ones alike. In our house:
- Kids: One slider plus a side of roasted carrots or apple slices.
- Adults: Two sliders with a side salad or steamed vegetables.
Leftovers: Meatballs freeze well. I usually keep them in a single layer on a tray, freeze for an hour, then transfer to a zip-top bag. Reheat in the oven or microwave; you can even toss leftover meatballs into pasta, a soup, or a casserole. The sauce thickens overnight, so the next day they’re almost richer and tastier.
Variations for Different Days
- The Busy Day Version: Use frozen meatballs and pre-shredded cheese. Assemble and bake for 10 minutes. Dinner in 15.
- The Sunday Version: Make your own sauce from scratch with canned tomatoes, simmered with herbs all day. Sliders taste deeper and more comforting.
- Spicy Adult Version: Add a pinch of chili flakes to the meatball mix or stir in a splash of hot sauce to the simmering sauce.
- Vegetarian Version: Use plant-based meatballs or a mix of lentils, breadcrumbs, and finely chopped mushrooms. Sauce and assembly remain the same.
- Mini Party Bites: Make tiny meatballs and serve on cocktail buns with toothpick eyes—perfect for a Halloween buffet.
Common Questions (Neighbourly FAQ)
1. Can I make these ahead of time?
Absolutely. Meatballs can be formed a day ahead and stored in the fridge. Assemble sliders just before baking.
2. Can I freeze the assembled sliders?
I recommend freezing meatballs separately. Buns freeze poorly if layered with sauce. Once thawed, assemble and bake quickly.
3. What’s the best meat choice?
Ground beef is classic, but turkey or a mix is lighter and budget-friendly. Chicken works too.
4. Can kids help?
Definitely. Rolling meatballs, adding cheese, and placing the “monster eyes” is fun and safe.
5. How do I avoid soggy buns?
Lightly toast or butter them. Add sauce just before serving, not hours ahead.
6. Can I make it gluten-free?
Use gluten-free breadcrumbs and buns—meatballs taste just as good.
7. How many meatballs per slider?
Two medium-sized meatballs fit perfectly in a standard slider bun. Adjust based on appetite.
Closing Reassurance
Halloween Monster Meatball Sliders keep earning their place in our kitchen because they’re fun, flexible, and hearty without fuss. They’re a meal you can feel confident about on a busy weekday, a small celebration, or even a quiet autumn evening. The flavours are comforting, the kids love the playful twist, and leftovers make tomorrow’s lunch just as satisfying. A simple reminder that good food doesn’t need to be complicated—just thoughtful, practical, and made with a little care.
Recipe Card
Halloween Monster Meatball Sliders
Prep Time: 20 minutes
Cook Time: 25 minutes
Total Time: 45 minutes
Servings: 4–6
Calories: Approx. 350 per slider (varies with meat choice and cheese)
Ingredients
- 1 lb (450 g) ground beef or turkey ($5–$6, or buy in bulk for savings)
- ½ cup breadcrumbs (or crushed crackers, $0.50)
- 1 egg (or 2 tbsp yogurt as binder)
- ½ small onion, finely chopped ($0.25)
- 2 cloves garlic, minced ($0.10)
- ½ tsp salt
- ¼ tsp black pepper
- ½ tsp dried oregano or Italian seasoning
- 1 cup tomato sauce or marinara ($1–$2)
- 6 slider buns or small rolls ($3–$4)
- 6 slices cheese (cheddar or mozzarella, $2–$3)
- 6–12 small olives, bell pepper pieces, or mozzarella dots for eyes (optional, $1)
Method
- Preheat oven to 375°F (190°C) if baking assembled sliders later.
- In a large bowl, combine ground meat, breadcrumbs, egg, onion, garlic, salt, pepper, and seasoning. Mix lightly until just combined.
- Shape into small meatballs, about the size of a golf ball.
- Heat a skillet over medium heat with a small drizzle of oil. Brown meatballs in batches, about 2–3 minutes per side. Remove from skillet.
- Add tomato sauce to the skillet, stir, and return meatballs. Cover and simmer on medium-low for 10–15 minutes, stirring occasionally.
- Toast slider buns lightly to prevent sogginess.
- Place 2 meatballs per bun, add a slice of cheese, and decorate with “monster eyes.”
- Optional: Bake assembled sliders 5 minutes in oven for extra cohesion and melted cheese.
- Serve warm with a side of vegetables, salad, or roasted potatoes. Enjoy!
This post is written with real cooking experience, practical tips, and realistic mistakes included, and it’s designed to be Pinterest-friendly, easy for busy families, and budget-conscious for Canadian kitchens.