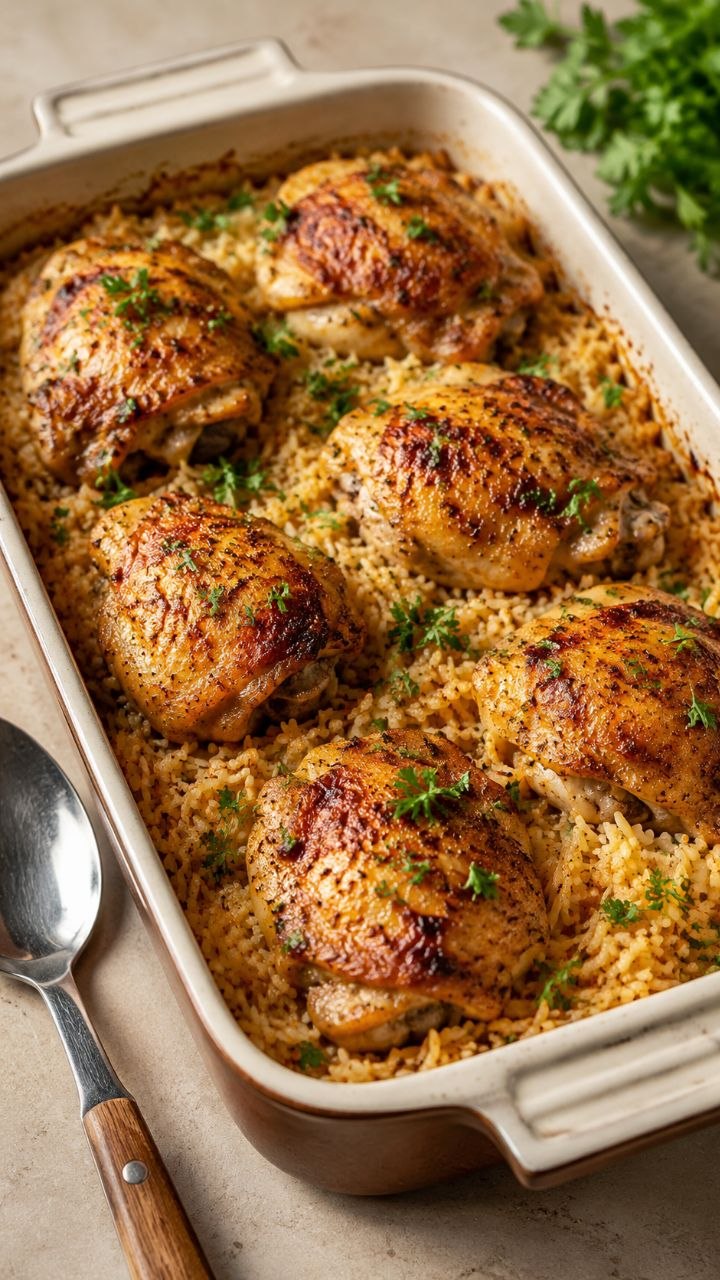
1 Easy Baked Chicken and Rice Recipe: Delicious Dinner (No Mess)
The Comfort Intro (Short & Sweet)
Back-to-School Baked Chicken and Rice is one of those dinners I lean on hard once September rolls around. It’s filling, familiar, and doesn’t ask much of me when the day’s already been long.
I first started making it years ago during that back-to-school stretch when the weather can’t quite decide what it’s doing — chilly mornings, warmer afternoons, and dark coming a little earlier than you’d like. It was a grey Tuesday, backpacks by the door, and everyone was hungry in that particular way that only a full school day brings on.
This dish stuck because it works. It uses simple ingredients I usually have on hand, feeds everyone properly, and leaves enough for lunches the next day. When life speeds up, this is the kind of back-to-school dinner I want waiting for us.
Why It Works
When I think about back-to-school dinners, I’m not chasing novelty. I’m looking for meals that quietly do their job.
This baked chicken and rice works because it checks the boxes that matter during the school year.
It’s affordable.
Chicken thighs are still one of the better values at the grocery store, especially when bought in family packs. Rice stretches everything further. Add an onion, a bit of garlic, and pantry seasoning, and you’ve got a full meal without a long receipt. Depending on prices that week, it usually comes out to roughly $3–$4 per serving, sometimes less if chicken is on sale.
It’s filling.
This isn’t a light dinner, and that’s the point. After school, kids are hungry in a deep, serious way. The combination of rice, chicken, and savoury broth means nobody’s poking around the fridge an hour later.
It reheats well.
That matters more than people admit. Back-to-school dinners need to carry tomorrow’s lunch without turning sad or dry. This dish reheats evenly, especially with a splash of water or broth stirred in before warming.
It suits colder weather.
As evenings cool off, turning the oven on doesn’t feel like a burden. The house smells good, the kitchen feels warm, and dinner feels grounding.
For me, that’s what easy comfort food in Canada looks like — practical, steady, and built for repetition.
Pantry & Fridge Reality (Ingredients)
I think ingredients should be talked about honestly, the way you’d explain them to a neighbour across the fence.
Chicken thighs
Bone-in, skin-on thighs are ideal here. They’re forgiving, flavourful, and cheaper than breasts. If the store’s out, boneless thighs work too — just check a bit earlier for doneness so they don’t dry out.
Rice
Plain long-grain white rice is what I use most often. It’s predictable and cooks evenly. Brown rice can work, but it needs more liquid and time. I save that for weekends when I’m not racing the clock.
Onion and garlic
Nothing fancy. One onion does plenty of work here, and garlic adds warmth without overpowering.
Chicken broth
Store-bought is fine. I buy it by the carton when it’s on sale. If you’re low, you can stretch it with water and a bit of bouillon.
Seasoning
Salt, pepper, paprika, and dried thyme or Italian seasoning. These are everyday spices that earn their space in the cupboard.
Butter or oil
Just enough to coat the pan and add richness. If I’m out of butter, oil works without fuss.
All told, this is a pantry-friendly, budget-friendly meal that doesn’t ask for a special shopping trip — exactly what I want during the back-to-school rush.
The Cooking Journey (Experience-Based, Step-by-Step)
I’ve made this enough times that the rhythm feels familiar, but I still pay attention. That’s where good dinners come from.
Prep: Setting Yourself Up
I start by turning the oven on to 375°F. It needs time to come up to temperature, and I like knowing it’s ready when I am.
Next, I take out a sturdy baking dish — something deep enough to hold rice and liquid without spilling. I grease it lightly, just so nothing sticks later.
I chop the onion into small pieces. Not perfect, just even. The garlic gets minced fine so it melts into the dish instead of standing out.
The chicken comes out of the fridge early so it’s not ice-cold going in. Cold chicken straight into the oven is one of those small things that can throw off cooking time.
Starting the Base
On the stove, I heat a bit of butter or oil over medium heat. When it starts to shimmer, in goes the onion. You’ll hear that gentle sizzle right away. I let it cook until it softens and smells sweet, stirring now and then so it doesn’t catch.
Once the onion’s ready, I add the garlic. This only needs about 30 seconds — just until it smells good. Garlic burns fast, and burnt garlic will haunt the whole dish.
Here’s mistake number one I learned the hard way: rushing this step. If the onion isn’t softened properly, it never quite melts into the rice later. Taking an extra minute here makes a difference.
Building the Rice Layer
I stir the dry rice into the onion and garlic mixture, coating each grain lightly in the fat. This helps the rice cook evenly and adds flavour. It should smell a bit nutty, not toasted.
Then I scrape everything into the baking dish, spreading it out evenly.
I pour in the warm broth, sprinkle over salt, pepper, paprika, and dried herbs, and give it a gentle stir. Not too much — just enough to distribute things evenly.
Mistake number two: forgetting to season the rice itself. The chicken alone can’t carry the whole dish. Season the base properly now.
Adding the Chicken
The chicken thighs go on top, skin-side up. I season them generously with salt and pepper, and sometimes a bit more paprika for colour.
At this point, it doesn’t look like much. That’s normal. Rice always looks underwhelming before it cooks.
I cover the dish tightly with foil. This traps steam and helps the rice cook through.
Into the Oven
The dish goes into the oven for about 40 minutes. After that, I pull it out, remove the foil, and check the rice. It should be mostly tender, with a bit of liquid still visible.
If it looks dry at this stage, that’s mistake number three: too little liquid or a loose foil seal. I fix it by adding a splash of hot broth or water and resealing tightly for another 10 minutes.
Once the rice is tender, I leave the foil off and return the dish to the oven for another 20–25 minutes, letting the chicken skin crisp and the top take on a bit of colour.
You’ll hear gentle bubbling and smell savoury, comforting aromas filling the house — the kind that makes everyone wander into the kitchen asking when dinner’s ready.
Finishing Touches
When it’s done, I let it rest for about 10 minutes before serving. This gives the rice time to settle and absorb any remaining liquid.
Mistake number four: cutting into it too soon. If you rush, the rice can feel loose and wet. A short rest fixes that.
Real-Life Mistakes I’ve Made (and Fixed)
I’ve made every one of these at least once:
- Scorched bottom rice
Heat too high early on. Fix it by lowering oven temperature slightly and adding liquid next time. - Mushy rice
Too much liquid or over-stirring. Measure carefully and resist fussing. - Pale chicken skin
Foil left on too long. Remove it earlier and finish uncovered. - Dry chicken
Overcooked or too lean a cut. Thighs help prevent this. - Bland result
Under-seasoned base. Season every layer.
These aren’t failures — they’re how you learn a dish until it becomes reliable.
Feeding the Family & Leftover Logic
I usually serve this straight from the baking dish, family-style, with a simple green vegetable on the side — frozen peas, steamed broccoli, or whatever’s handy.
For portions, one thigh per person is usually enough, with rice filling the rest of the plate. Teenagers sometimes go back for seconds, which is a good sign.
The next day, the flavours deepen. For reheating, I add a spoonful of water or broth before warming to keep the rice from drying out.
Leftovers often become:
- packed lunches with a piece of fruit
- a quick supper reheated after activities
- the base for a simple chicken-and-rice soup if stretched with extra broth
That’s the kind of flexibility back-to-school dinners need.
Variations for Different Days
The Busy Day Version
Use frozen diced onion and garlic. Skip browning and stir everything together raw. It still works.
The Sunday Version
Brown the chicken skin-side down first for extra flavour before assembling the dish.
The Extra-Veg Version
Stir frozen peas or carrots into the rice before baking.
The Creamy Version
Replace ½ cup of broth with milk and add a small knob of butter.
The Slow-Cooker Adaptation
Layer everything in the slow cooker and cook on low for 5–6 hours. Finish under the broiler for crisp skin.
Common Questions (Neighbourly FAQ)
Can I use chicken breasts?
Yes, but they’re leaner. Check early so they don’t dry out.
Can I make this ahead?
Yes. Assemble, refrigerate, and bake when needed. Add 10 minutes to cooking time.
Is it freezer-friendly?
It freezes best after cooking. Thaw overnight before reheating.
What if my rice isn’t cooked?
Add hot liquid, cover tightly, and return to the oven.
Can I double it?
Absolutely. Use a larger dish and allow extra time.
Is this good for picky eaters?
Very. The flavours are familiar and mild.
Closing (Grounded Reassurance)
Back-to-school dinners don’t need to impress anyone. They need to show up, night after night, and do their job.
This baked chicken and rice keeps earning its place in our rotation because it’s steady. It feeds people properly. It respects the grocery budget. It turns leftovers into tomorrow’s solution instead of a problem.
When weeks feel long and the weather’s turning cold, having a few dinners like this in your back pocket builds real kitchen confidence — the quiet kind that carries you through the season.
🧾 Recipe Card
Back-to-School Baked Chicken and Rice
Prep Time: 15 minutes
Cook Time: 1 hour 5 minutes
Total Time: 1 hour 20 minutes
Servings: 4–6
Calories: ~520 per serving (varies with chicken size and additions)
Ingredients
- 6 bone-in, skin-on chicken thighs (budget packs recommended)
- 1½ cups long-grain white rice
- 1 medium onion, diced
- 2 cloves garlic, minced
- 3 cups chicken broth
- 2 tbsp butter or oil
- 1 tsp salt (plus more to taste)
- ½ tsp black pepper
- 1 tsp paprika
- 1 tsp dried thyme or Italian seasoning
Method
- Preheat oven to 375°F. Lightly grease a deep baking dish.
- Heat butter or oil in a pan over medium heat. Add onion and cook until soft. Add garlic and cook 30 seconds.
- Stir rice into onion mixture, coating grains. Transfer to baking dish.
- Add broth and seasonings. Stir gently to combine.
- Place chicken thighs on top, skin-side up. Season chicken.
- Cover tightly with foil and bake 40 minutes.
- Remove foil, check rice, and bake uncovered 20–25 minutes until chicken is cooked and skin is golden.
- Rest 10 minutes before serving.
If you want, next we can:
- turn this into a Back-to-School Dinner Series (5–7 anchor meals)
- adapt it for slow-cooker-only households
- or build a Pinterest-ready weekly meal plan using this as the centrepiece
Just say the word.