Halloween Bandage Cookies: 5 Effortless Fixes for Spooky, Red-Jam, October Baking Days
The Comfort Intro (Short & Sweet)
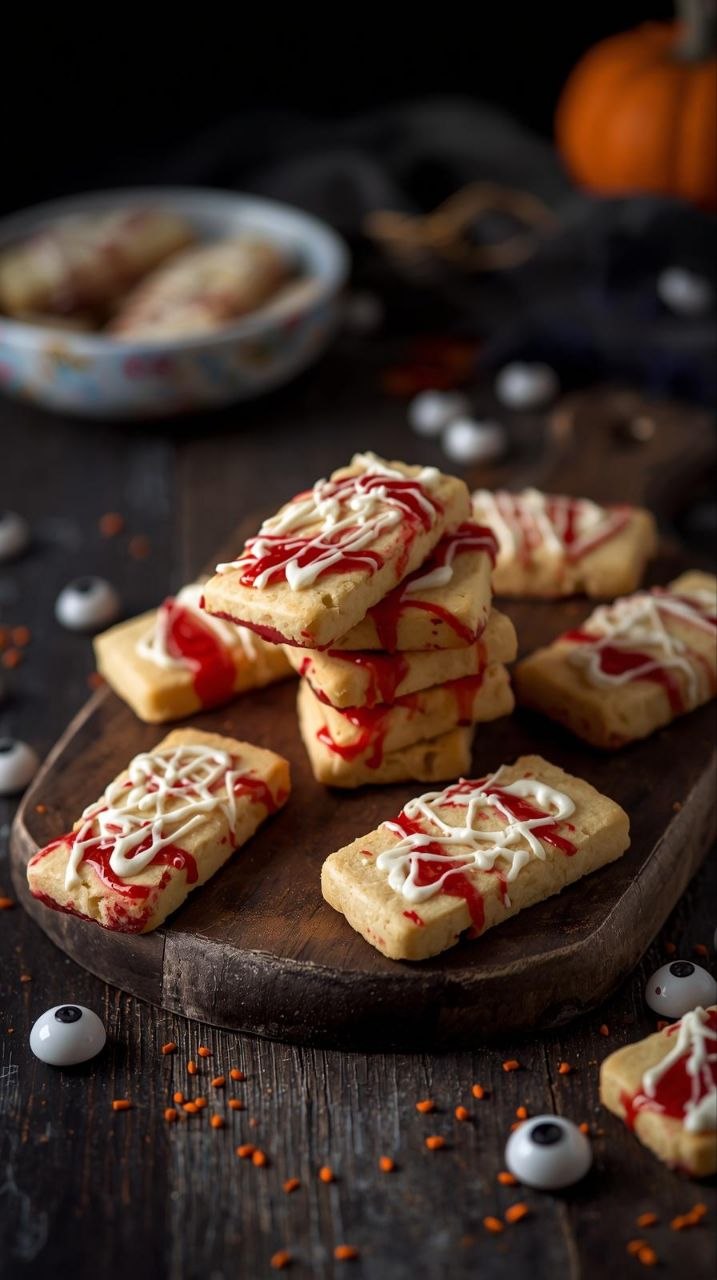
Halloween bandage cookies are one of those little baking projects I come back to every October. They’re simple sugar cookies dressed up to look like bandages, with a dab of red jam in the middle. Nothing fancy, nothing fussy — just a bit of fun that fits nicely into a busy week.
I usually make these on a cool afternoon when it’s already getting dark earlier than I’d like. The house feels quieter, the kettle’s on, and Halloween is just around the corner. These cookies don’t take much planning, and they’re a good way to make something seasonal without turning the kitchen upside down.
They’re especially handy if you’ve promised “Halloween baking” to kids or grandkids but don’t want to commit to an all-day project. I’ve learned over the years that simple wins — especially when it still tastes good the next day.
Why It Works
These Halloween bandage cookies work because they’re built on a reliable sugar cookie dough that doesn’t spread too much and doesn’t require any specialty ingredients. I’m not interested in recipes that only work once or rely on tricks I’ll forget by next year. This one is steady and forgiving.
From a cost point of view, they’re very reasonable. Flour, butter, sugar, eggs — all pantry basics. The only “extra” is a bit of red jam or jelly, and that’s something most of us already have tucked in the fridge. When I price it out, it usually comes to about 30–40 cents per cookie, depending on butter prices and how generous you are with the jam.
They’re filling enough that one or two feels like a proper treat, especially with a mug of tea or hot chocolate. They hold up well in a container for several days, which matters in October when baking often has to fit around school, work, and everything else.
They also adapt well to colder weather baking. You’re not rushing dough in and out of the fridge on a hot day, and the cooler kitchen actually helps keep the cookie shapes neat. That’s a small thing, but it makes the whole process calmer.
Pantry & Fridge Reality (Ingredients)
I approach the ingredients for these cookies the same way I do most baking — what’s already here, and what can be swapped if needed.
Butter:
I use regular salted butter most of the time. If all you have is unsalted, just add a small pinch of salt to the dough. Butter prices can sting, so I often buy it on sale and freeze it. For baking, frozen butter works fine once it’s thawed properly.
Sugar:
Plain white granulated sugar is what gives these cookies their structure. I don’t recommend swapping in brown sugar for this one — it changes the colour and softness too much for the bandage look.
Eggs:
Large eggs, straight from the fridge, are fine. No need to bring them to room temperature unless your kitchen is very cold.
Flour:
All-purpose flour is all you need. I buy large bags when they’re on sale because baking season here tends to run from October right through March.
Vanilla:
Use what you have. Pure vanilla is lovely, but artificial vanilla works just fine in a cookie like this where it’s not the star.
Baking Powder:
Just enough to give a bit of lift without spreading.
Jam or Jelly:
This is where the “bandage” detail comes in. Red raspberry or strawberry jelly works best because it stays bright. If all you have is strawberry jam with seeds, that’s fine — it just looks a bit more rustic. I’ve even used red currant jelly when that’s what was in the fridge.
Icing Sugar (Optional):
For a light glaze or cross-striping if you want the bandage look to be clearer. This is optional, not mandatory.
Nothing here requires a special trip to the store, and that’s always my goal.
The Cooking Journey (Experience-Based)
Getting Started
First, I start by setting the butter out on the counter while I gather everything else. In a cool Canadian kitchen, it usually takes about 30–40 minutes to soften properly. If it’s still firm, the dough will fight you later, and I’ve learned not to rush this step.
Once the butter is soft enough to press a finger into easily, I cream it with the sugar. I use a hand mixer most days, but a wooden spoon and some patience works too. You’re listening for that soft, gritty sound to turn smoother as air gets worked in. The mixture should look pale and fluffy, not greasy.
Next, I add the egg and vanilla. This is where the dough can look a bit split at first. I keep mixing until it comes together again. If it still looks curdled, a spoonful of flour usually fixes it.
Mixing the Dough
After that, I stir together the flour and baking powder in a separate bowl. I don’t skip this — adding baking powder straight into the wet mix can lead to uneven pockets.
I add the dry ingredients gradually, mixing on low or by hand. The dough should be soft but not sticky. If it clings to your fingers, a tablespoon of flour at a time helps. I’ve made the mistake of adding too much flour here, and it leads to dry cookies, so I go slowly.
Once the dough comes together, I wrap it and chill it. Even a short chill — 30 minutes — makes rolling much easier and helps the cookies keep their shape.
Shaping the Bandages
Once the dough is chilled, I roll it out on a lightly floured counter. I aim for about ¼-inch thickness. Too thin, and the cookies bake up crisp and fragile. Too thick, and they don’t look quite right.
I cut rectangles for the bandage shape. A knife works just fine if you don’t have a cutter. I’ve learned to keep the shapes simple — perfection isn’t the goal.
Next, I cut a smaller rectangle out of the centre of half the cookies. These will be the “top” pieces. The cut-out doesn’t need to be exact; uneven edges actually look more realistic.
Baking
I bake the cookies in a moderate oven. As they bake, the kitchen fills with that familiar buttery smell that always feels like October to me. I keep an eye on the edges — they should just be turning pale golden, not brown.
One mistake I made early on was overbaking because I wanted them “done.” These cookies firm up as they cool, so it’s better to pull them out a touch early.
Assembly
Once the cookies are completely cool — and this matters — I spread a small amount of red jam on the solid cookie bases. Not too much, or it will ooze out the sides.
I place the cut-out cookies on top, gently pressing them into place. If I’m adding icing sugar glaze or stripes, I do that last, once everything is set.
Real-Life Mistakes I’ve Made (and How to Fix Them)
- Dough too soft to handle:
Back into the fridge for 15 minutes. No harm done. - Cookies spreading too much:
The butter was too warm. Chill the cut cookies before baking. - Dry, crumbly cookies:
Too much flour. Next time, stop mixing sooner and measure more carefully. - Jam leaking everywhere:
Less is more. A teaspoon is plenty. - Overbrowned bottoms:
Move the rack up and check your oven temperature — many run hot. - Icing melting into the jam:
Cookies weren’t fully cool. Patience matters here.
Every one of these has happened in my kitchen, usually when I was rushing.
Feeding the Family & Leftover Logic
I usually plan on one to two cookies per person, depending on what else is going on. If it’s after supper, one is plenty. If it’s an afternoon treat, two feels right.
These cookies keep well in a covered container at room temperature for about four days. The jam stays soft, and the cookies don’t dry out too quickly. If the house is warm, I’ll store them in the fridge and bring them out before serving.
Leftovers make good lunchbox treats or an easy offering when someone stops by for coffee. They’re sturdy enough to travel, which matters during busy October days.
Variations for Different Days
The Busy Day Version:
Use store-bought sugar cookie dough and focus on the shaping and assembly. Not my first choice, but it works.
The Sunday Version:
Make the dough in the morning, bake in the afternoon, and assemble after supper. Slower, calmer, and enjoyable.
Lower Sugar Option:
Use a lightly sweetened jam and skip any icing. Still festive, just a bit less sweet.
Colder Weather Twist:
Add a pinch of cinnamon to the dough for warmth. It’s subtle but nice.
Allergy-Friendly:
Use a plant-based butter and egg substitute — the dough handles surprisingly well.
Common Questions (Neighbourly FAQ)
Can I make the dough ahead?
Yes. It keeps well in the fridge for up to two days.
Can I freeze these cookies?
The baked cookies freeze well without the jam. Assemble after thawing.
Do they need icing?
No. It’s optional and purely decorative.
Can kids help?
Absolutely. Cutting shapes and spooning jam are good jobs for small hands.
What if I don’t have red jam?
Any bright jam works, even apricot for a different look.
Do they travel well?
Yes, just layer with parchment.
Closing (Grounded Reassurance)
Halloween bandage cookies aren’t about perfection. They’re about making something familiar feel a bit festive during a busy, chilly season. I keep coming back to this recipe because it works, it doesn’t ask much, and it brings a bit of quiet fun into the kitchen.
When the weeks get long and the days get shorter, recipes like this help build confidence. You make them once, then again the next year, and before long they’re just part of how October feels in your house.
That kind of reliability is worth holding onto.
🧾 Recipe Card: Halloween Bandage Cookies
Prep Time: 30 minutes
Cook Time: 12 minutes per batch
Total Time: 1 hour 15 minutes
Servings: 24 cookies
Calories: ~160 per cookie (varies with jam and icing)
Ingredients
- 1 cup butter, softened (about $2.50)
- 1 cup granulated sugar (about $0.50)
- 1 large egg
- 1 tsp vanilla extract
- 2½ cups all-purpose flour (about $0.75)
- 1 tsp baking powder
- ½ cup red jam or jelly
- Icing sugar and milk (optional glaze)
Method
- Cream butter and sugar until light and fluffy.
- Beat in egg and vanilla until combined.
- In a separate bowl, mix flour and baking powder.
- Gradually add dry ingredients to wet, mixing until a soft dough forms.
- Chill dough for 30 minutes.
- Roll out dough to ¼-inch thickness and cut rectangles.
- Cut smaller rectangles from half the cookies.
- Bake at 350°F (180°C) for 10–12 minutes until edges are lightly golden.
- Cool completely.
- Spread a small amount of jam on solid cookies and top with cut-out cookies.
- Add icing glaze if desired and let set.
If you’d like, I can next:
- Create Pinterest pin descriptions
- Build a Halloween baking collection intro
- Write 3–5 internal linking blurbs
- Or adapt this recipe for printable cards
Just tell me where you want to take it.